
Are you in the market for a new baseball glove?
We have put together a list of the best baseball gloves on the market today. Whether you are a seasoned veteran or just starting out, we are sure that you will find something to love in our list!
With so many different options to choose from, it can be hard to know which glove is right for you.
That is why we have taken the time to compile this list and provide you with all the information you need to make an informed decision.
How We Choose The Best Baseball Gloves
It can be hard to know which baseball gloves are the best, because there are so many different baseball glove brands and models out there.
You don't want to waste your time or money on a baseball glove that won't work well for you.
So, we did all the hard work for you. After reading and analyzing thousands of customer reviews, we found the best baseball gloves on the market today.
Whether you're looking for the best outfield gloves or the best infield gloves, we found the best baseball gloves for you.
Read on to find the best baseball glove that fits your style of play!
Top Shelf Features
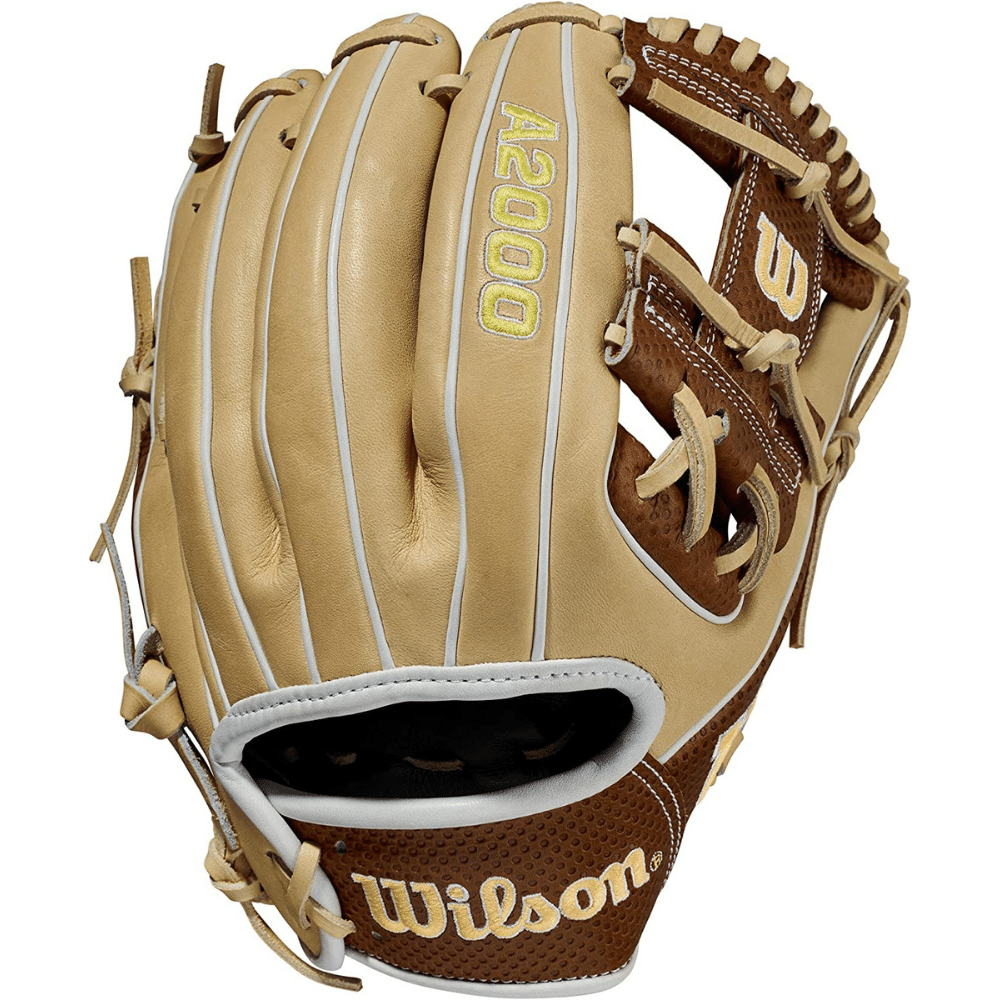
If you're looking for a baseball glove that can help you make those tough plays in the field, then you need to be looking at Wilson baseball gloves.
The all-new Wilson A2000 SC1786 is designed with its innovative SpinControl Technology, which helps slow the spin of a ball as it hits your glove.
This means you can get it out of the Wilson A2000 SC1786's shallow pocket quicker than ever, firing a perfect throw for the out.
Top Shelf Details
The Wilson A2000 is a workhorse of a baseball glove, and the new ComfortPro Fit only makes it better making it one of the best infield gloves on the market.
ProLux Premium Leather on the Wilson A2000 gives the liner a richer, softer feel, while the all-new Comfort Sleeve conceals the binding in the wrist for more comfort.
Rolled Dual Welting and a Thin Heel Pad add to the durability of the baseball glove, and the Dri Lex Wrist Lining helps to keep your hand cool and dry.
Whether you're on the diamond or in the backyard, the Wilson A2000 baseball glove is sure to be your go-to glove.
Top Shelf Features
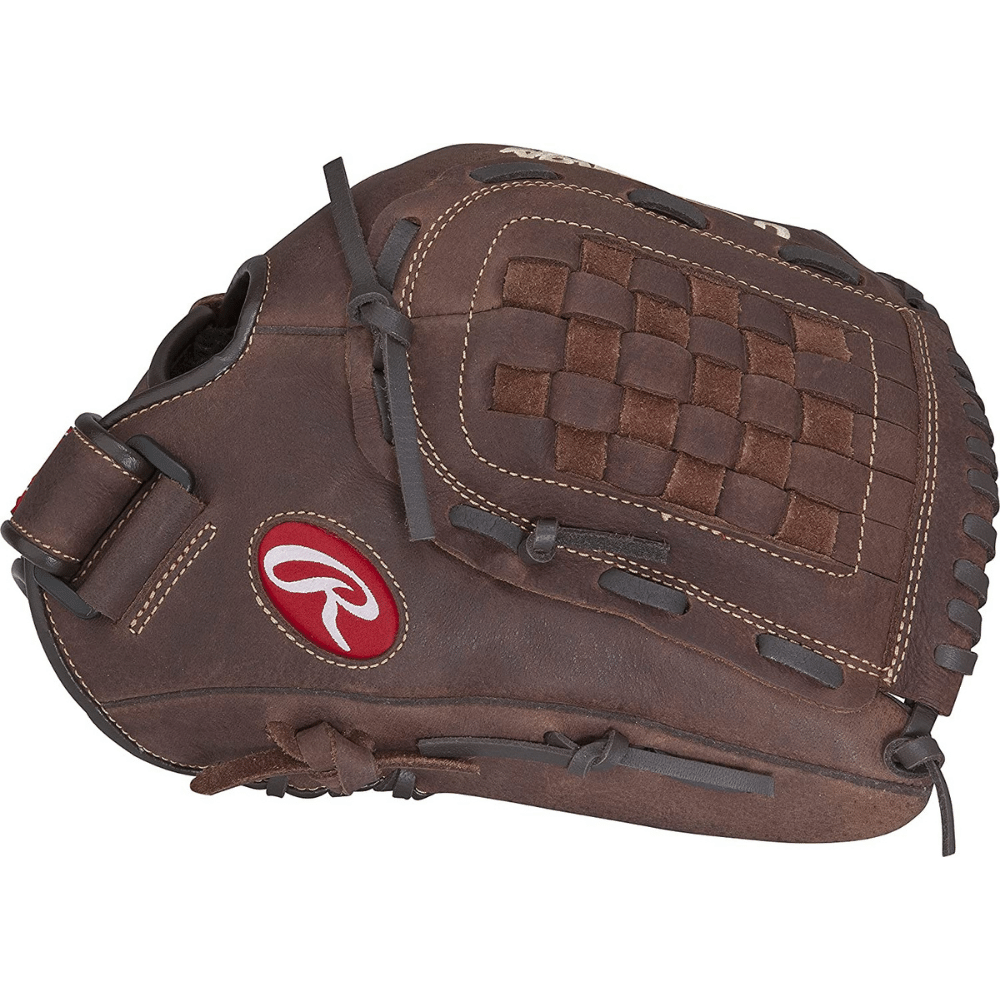
Looking for a versatile baseball glove that can be used for recreational baseball or slow pitch softball? Rawlings' Player Preferred Glove Series is perfect for you!
They're highly rated with over 7,000+ reviews. These baseball gloves are designed to be easily used by players of all skill levels, making them perfect for recreational play.
They feature zero shock palm pads and a shallow pocket design that makes it easy to scoop up grounders and grab fly balls.
So if you're looking for a baseball glove that can do it all, look no further than the Player Preferred Glove Series from Rawlings.
Top Shelf Details
The Player Preferred Glove series is perfect for any infield or outfield position. The soft, flexible shell and lining material is easy on the hand while providing a snug fit.
It comes 80% factory broken-in, which means the baseball glove requires little player break-in, so it's game-ready right out of the box!
The versatile glove can be used as the best infield glove or the best outfield glove, and the quality full grain leather ensures enhanced durability.
The zero shock palm padding and full grain leather provides increased impact protection while catching, making this baseball glove one of the best baseball gloves for players at any level.
Top Shelf Features
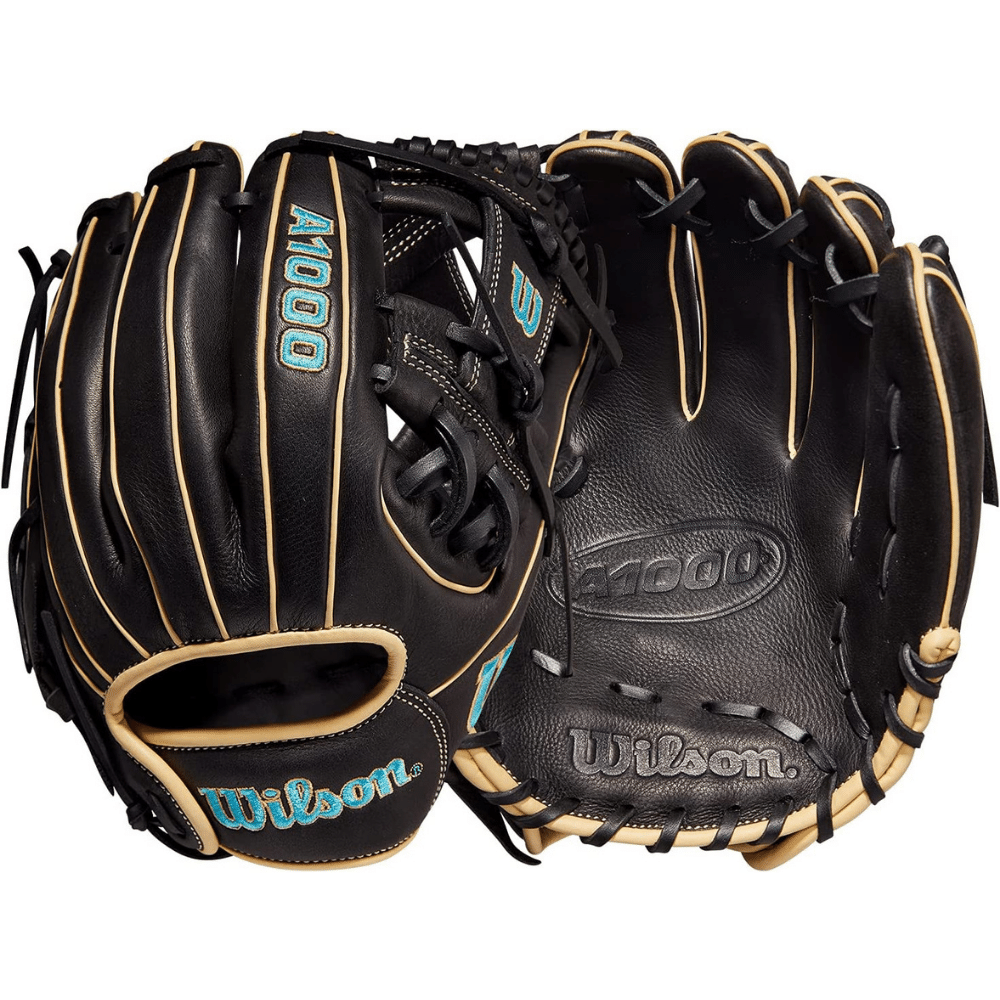
Looking for a baseball glove that's specifically designed to fit smaller hands?
Then check out the WILSON 2022 A1000 Baseball Glove Series! This 11.5" infield glove features a narrower wrist opening and shorter finger stalls to create a snug, comfortable fit.
The black full-grain leather looks sleek and professional, while the tropical blue outlined logos add a pop of color. Plus, the H-web and shallow pocket make transfers a breeze.
Whether you're just starting out or you're a seasoned pro, the WILSON 2022 A1000 Baseball Glove Series is a great option for anyone with smaller hands.
Top Shelf Details
Wilson's A1000 baseball gloves are designed for ultimate comfort and durability.
The rolled dual welting provides better support and helps the glove hold its shape, while the thin heel pad design allows for quicker break-in and better closure.
The DriLex wrist lining keeps your hand dry and comfortable on the field and behind the dish. Wilson gloves are a great choice for any baseball player looking for maximum performance.
Top Shelf Features
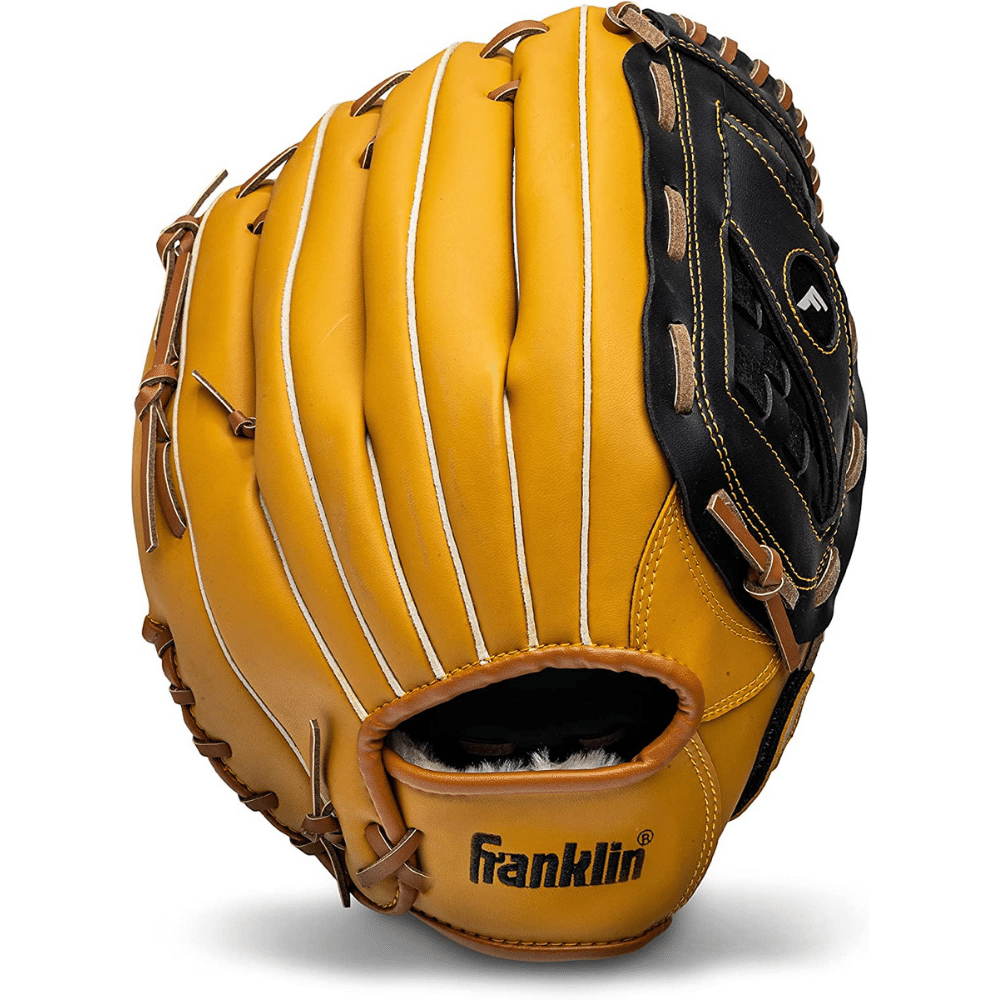
The budget friendly Franklin Sports Baseball and Softball Glove - perfect for players of all ages and skill levels!
The soft synthetic leather material is lightweight and responsive, making the glove easy and quick to break in. With the Contour Fit System, you can customize the thumb-adjustment to expand or tighten, so you'll always have a perfect snug fit.
Whether you're playing baseball, softball, or tee-ball, this versatile glove is game-ready in no time!
Top Shelf Details
The Wilson A1000 is one of the best wallet friendly baseball gloves on the market. It is made of a thick, premium synthetic leather that is designed to mimic the performance and durability of a true leather mitt.
The hand formed pocket provides maximum comfort and responsive feel for making scoops and catches without drops.
Wilson is a trusted name in baseball, and the A1000 is their top cost efficient baseball glove. If you are looking for a baseball glove that will last you for years, the Wilson A1000 is the perfect choice.
Top Shelf Features
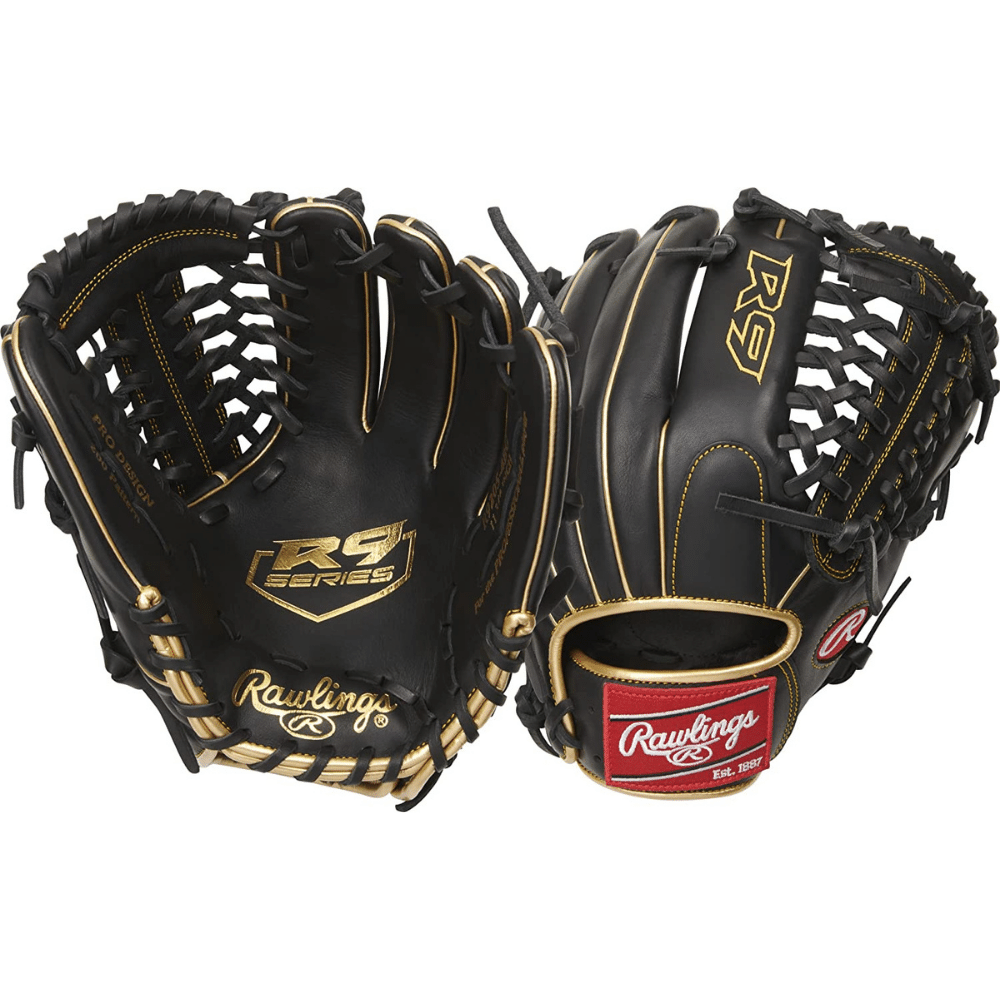
The Rawlings R9 baseball glove series is the perfect choice for infield or outfield players.
With an 80% factory break-in, this glove is game ready and won't require a lot of time to break in.
Ideal for select players ages 8-14, the R9 is a great choice for any young player looking to take their game to the next level.
Top Shelf Details
The Rawlings R9 baseball glove series is perfect for any young player looking for a pro style glove with a soft, comfortable feel.
The all-leather shell is durable and padded thumb loops, reinforced palm, and enhanced fingerback linings help to protect each player's hand.
With the soft, flexible shell and lining materials, catching is made easy with the R9 Glove series.
Top Shelf Features
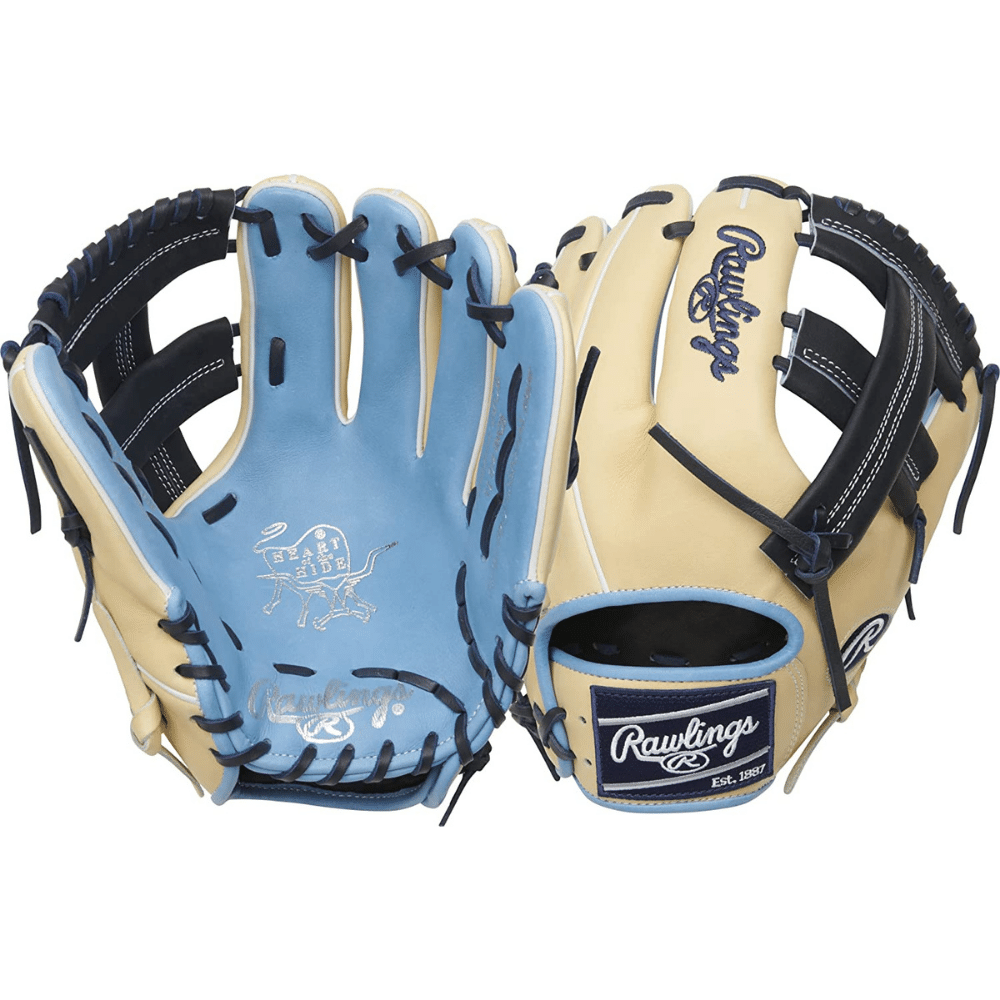
If you're looking for a top-of-the-line baseball glove, you can't go wrong with this Editor's Choice, the Rawlings Heart of the Hide series.
These gloves are constructed from Rawlings' world-renowned Heart of the Hide steer leather, making them some of the highest quality gloves on the market.
They've defined the careers of some of the greatest players in the game, and now they're available to elite athletes looking to join the next class of defensive greats.
With their superior craftsmanship and durability, Rawlings Heart of the Hide gloves are sure to help you take your game to the next level.
Top Shelf Details
The Rawlings Heart of the Hide series gloves are some of the most popular middle infielders gloves on the market and for good reason.
They're made from only the top 5% of hides available, so you know you're getting a high-quality premium leather with this infield glove.
The deertanned cowhide leather is soft and durable, and the palm lining provides extra comfort. The fingerback linings are made from full-grain leather for a soft feel.
If you're looking for a top-of-the-line glove, the Rawlings Heart of the Hide series is a great option.
Which Of These Best Baseball Gloves Are Right For You
So, which is the best baseball glove for you? We covered a lot in this article, but we hope that this has has helped guide you to the best baseball glove for you.
Remember to think about the type of player you are and what features will work best for your style of play.
Be sure to click through to check out the prices on these Top Shelf Rated gloves and find the perfect one for your game.
As always, thanks for reading!
Best Baseball Gloves FAQs
Here are the most frequently asked questions about the best baseball gloves:
How do you determine baseball glove size?
When determining the size of a baseball glove, you need to measure the hand from the base of the palm to the tip of the middle finger.
Use this measurement to find the corresponding size baseball glove in inches. For example, if your measurement is 8.5 inches, then you would need a size 8.5 baseball glove.
How do you break in a glove?
The best way to break in a new glove is to use it. Play catch with it, hit some balls off a tee with it. The more you use it, the softer and more comfortable it will become.
If you're in a hurry, you can try using a hair dryer. Heat up the glove for about 30 seconds on high heat, then put it on and flex your hand around.
Do this for about 5 minutes and the glove should be flexible enough to wear comfortably.
How should a baseball glove fit on your hand?
A baseball glove should fit snugly on your hand. It should not be too tight or too loose. When you put it on, the glove should mold to the shape of your hand.
Some people like to line the inside of the glove with a layer of moleskin or batting to make it more comfortable and to help keep the gloves in good condition. You can also buy a spray that will waterproof and protect your gloves.
What size glove does a shortstop use?
It depends on the brand of glove. For example, Wilson gloves typically use a size 11 ½” glove, while Rawlings gloves use a size 12” glove.
There are a few things to keep in mind when choosing a glove size. First, the player’s hand should fit comfortably into the glove with enough room to make a fist.
Second, when closing the glove, the fingertips should reach the second knuckle of the thumb.
Finally, it’s important to remember that different sizes are available for different positions on the field.
For example, first basemen need a bigger glove because they catch throws from outfielders, while second basemen and shortstops need smaller gloves.
What size gloves do MLB pitchers use?
Most pitchers use gloves that are size 10 or 11. There is no one perfect size glove for all pitchers, as each pitcher has a different hand size and grip preference.
Some pitchers, such as Greg Maddux, prefer smaller gloves so they can have a better grip on the ball.
Other pitchers, such as Randy Johnson, prefer larger gloves to give them more protection against wild pitches and line drives back to the mound.
What is a better glove, Wilson or Rawlings?
There are a lot of different factors to consider when choosing a glove, such as fit, feel, durability, and price.
Wilson and Rawlings are both popular brands, so it really comes down to personal preference.
Some people might prefer the feel of one glove over the other, while others might find that one brand is more durable than the other.
Ultimately, it's up to the individual to decide which glove is best for them.
What does steaming a baseball glove do?
It softens the glove and makes it more pliable. This is because the heat from the steam causes the molecules in the material to move around more, which makes the fabric softer.
How long do baseball gloves last?
Baseball gloves can last for a number of years, but they eventually need to be replaced. The main reason baseball gloves need to be replaced is because the high quality leather becomes brittle and starts to crack.
Baseball gloves also need to be replaced if they are stained or if the padding inside them wears down.
It's also a good idea to replace a baseball glove every few years even if it doesn't look bad, because over time the high quality leather will lose its flexibility and won't perform as well as a new glove.
How do I know if I need a new baseball glove?
There are a few ways to know if you need a new baseball glove. One way is to check the webbing between the fingers - if it's starting to fray, then the glove is beginning to wear out.
You can also check the condition of the glove's seams and palm liner; if they're starting to come apart, it's time for a new one.
Finally, if your glove isn't providing enough cushioning and protection for your hand, then it might be time for a new one.
How long does it take to break in a new baseball glove?
It usually takes about 50-70 hours of game play to break in a new baseball glove.
Baseball gloves stretch and form to the individual's hand with use. The more the glove is used, the better the fit and feel.
Players often apply a conditioner to their gloves to help soften and break them in quicker.